YOLOv8 Webcam Detection
Build a full-screen real-time object detection app with YOLOv8, MJPEG streaming, and a React frontend on WendyOS
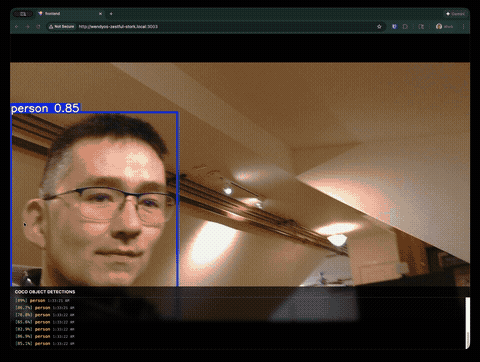
Real-Time COCO Object Detection with YOLOv8
This guide walks you through building a complete webcam detection application that runs YOLOv8 on a WendyOS device. The app features a full-screen video feed with bounding box overlays and a detection log showing identified objects from the COCO dataset (80 classes including people, cars, animals, and everyday objects).
The complete sample is available in the samples repository.
What You'll Build
- A FastAPI backend that captures webcam frames and runs YOLOv8 inference
- MJPEG video streaming with detection overlays drawn by YOLOv8
- A React + Tailwind frontend with full-screen video and a detection log overlay
- A Docker container optimized for NVIDIA Jetson devices
Prerequisites
- Wendy CLI installed on your development machine
- Docker installed (see Docker Installation)
- A WendyOS device (NVIDIA Jetson Orin Nano, Jetson AGX, etc.)
- A USB webcam connected to your WendyOS device
Recommended Webcams: See our Buyers Guide for webcam recommendations including the Logitech C920 and C270.
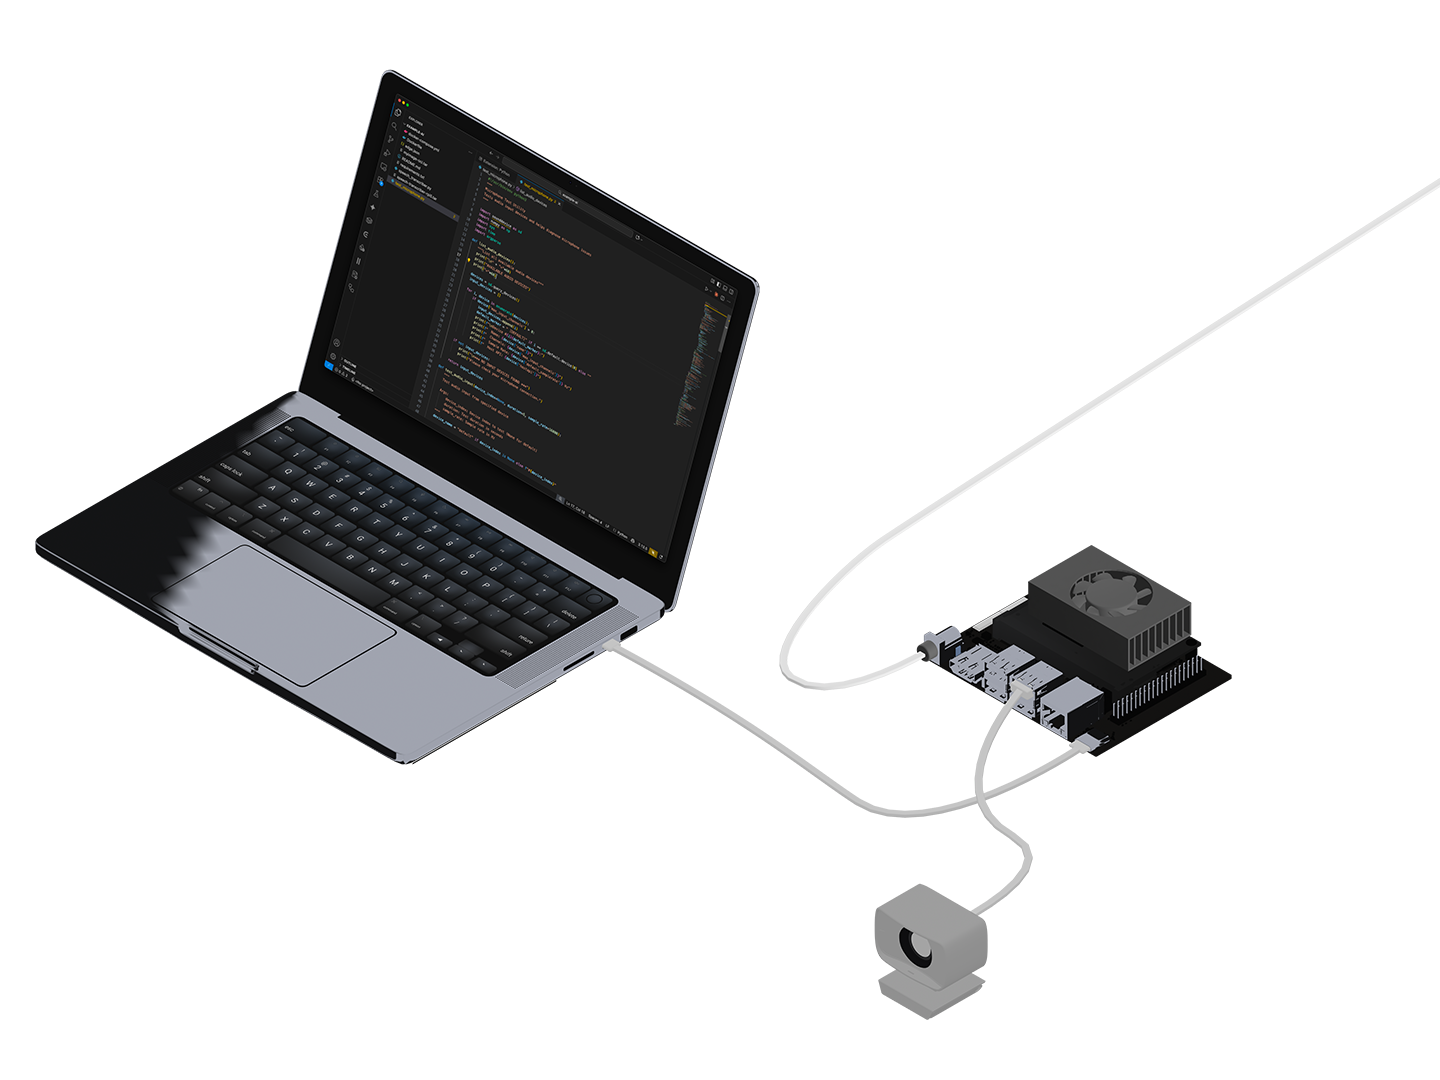
Understanding the Architecture
This sample uses a prebuilt Ultralytics Docker image specifically optimized for Jetson devices. The ultralytics/ultralytics:latest-jetson-jetpack6 image comes with:
- YOLOv8 and the Ultralytics library pre-installed
- OpenCV with CUDA support
- PyTorch optimized for Jetson GPUs
- All necessary CUDA libraries
This means you don't need to compile OpenCV or PyTorch from source - saving significant build time.
Large Image Size: The Ultralytics Jetson image is approximately 5-9 GB in size. Initial uploads to your device can be slow depending on your network connection. See the Speeding Up Uploads section for tips.
Project Structure
yolov8/
├── Dockerfile
├── wendy.json
├── server/
│   └── app.py
└── frontend/
    ├── package.json
    ├── src/
    │   ├── App.tsx
    │   └── main.tsx
    └── ...
Clone the Sample
The easiest way to get started is to clone the samples repository:
git clone https://github.com/wendylabsinc/samples.git
cd samples/python/yolov8
Understanding the Dockerfile
The Dockerfile uses a multi-stage build:
# Build frontend
FROM node:22-slim AS frontend-builder

WORKDIR /app/frontend
COPY frontend/package*.json ./
RUN npm ci
COPY frontend/ ./
RUN npm run build

# Runtime stage - Ultralytics official Jetson image
FROM ultralytics/ultralytics:latest-jetson-jetpack6

WORKDIR /app

# Only need to install web server dependencies
RUN pip3 install --no-cache-dir fastapi "uvicorn[standard]"

# Pre-download the YOLOv8 model during build (so it works offline)
RUN python3 -c "from ultralytics import YOLO; YOLO('yolov8n.pt')"

# Copy server files
COPY server/app.py ./

# Copy the built frontend
COPY --from=frontend-builder /app/frontend/dist ./frontend/dist

ENV FRONTEND_DIST=/app/frontend/dist
ENV PYTHONUNBUFFERED=1

EXPOSE 3003

CMD ["uvicorn", "app:app", "--host", "0.0.0.0", "--port", "3003"]
Key points:
- The first stage builds the React frontend with Node.js
- The second stage uses the prebuilt Ultralytics Jetson image
- The YOLOv8 model (
yolov8n.pt) is downloaded during build, not at runtime - This ensures the app works even if the device has no internet access
Understanding the Backend
The FastAPI backend (server/app.py) handles webcam capture, YOLOv8 inference, MJPEG streaming, and detection logging:
from collections import deque
from datetime import datetime, timezone
from fastapi import FastAPI
from fastapi.responses import StreamingResponse
import cv2
from ultralytics import YOLO

app = FastAPI()

# Load YOLOv8 model (pre-downloaded in Docker build)
model = YOLO("yolov8n.pt")

# Store recent detections for the log
detection_log: deque = deque(maxlen=100)

def generate_frames():
    """Generate MJPEG frames with YOLOv8 detection overlay."""
    cap = cv2.VideoCapture(0)
    cap.set(cv2.CAP_PROP_FRAME_WIDTH, 1280)
    cap.set(cv2.CAP_PROP_FRAME_HEIGHT, 720)

    while True:
        ret, frame = cap.read()
        if not ret:
            break

        # Run YOLOv8 inference
        results = model(frame, verbose=False)

        # Log detections with confidence > 50%
        timestamp = datetime.now(timezone.utc).isoformat()
        for result in results:
            for box in result.boxes:
                conf = float(box.conf[0])
                if conf > 0.5:
                    cls_name = model.names[int(box.cls[0])]
                    detection_log.append({
                        "label": cls_name,
                        "confidence": round(conf * 100, 1),
                        "timestamp": timestamp
                    })

        # Draw bounding boxes and encode as JPEG
        annotated_frame = results[0].plot()
        _, buffer = cv2.imencode('.jpg', annotated_frame,
                                 [cv2.IMWRITE_JPEG_QUALITY, 80])

        yield (b'--frame\r\n'
               b'Content-Type: image/jpeg\r\n\r\n' +
               buffer.tobytes() + b'\r\n')

@app.get("/api/video-feed")
async def video_feed():
    """Stream MJPEG video with YOLOv8 detections."""
    return StreamingResponse(
        generate_frames(),
        media_type="multipart/x-mixed-replace; boundary=frame"
    )

@app.get("/api/detections")
async def get_detections():
    """Get recent detections for the log overlay."""
    return list(detection_log)[-20:]
How it works:
generate_frames()captures webcam frames and runs YOLOv8 inferenceresults[0].plot()draws bounding boxes directly on the frame- Detections above 50% confidence are logged with label, confidence, and timestamp
/api/detectionsreturns the last 20 detections for the frontend overlay
Understanding the Frontend
The React frontend (frontend/src/App.tsx) displays a full-screen video feed with a detection log overlay:
import { useState, useEffect, useRef } from "react";

interface Detection {
  label: string;
  confidence: number;
  timestamp: string;
}

function App() {
  const [detections, setDetections] = useState<Detection[]>([]);
  const logRef = useRef<HTMLDivElement>(null);

  useEffect(() => {
    // Poll for detections every 500ms
    const fetchDetections = async () => {
      const response = await fetch("/api/detections");
      const data: Detection[] = await response.json();
      setDetections(data);
    };

    fetchDetections();
    const interval = setInterval(fetchDetections, 500);
    return () => clearInterval(interval);
  }, []);

  useEffect(() => {
    // Auto-scroll to bottom of log
    if (logRef.current) {
      logRef.current.scrollTop = logRef.current.scrollHeight;
    }
  }, [detections]);

  return (
    <div className="relative h-screen w-screen overflow-hidden bg-black">
      {/* Full-screen video feed */}
      <img
        src="/api/video-feed"
        alt="YOLOv8 Detection Feed"
        className="absolute inset-0 h-full w-full object-contain"
      />

      {/* Bottom overlay for detection log (1/5 of screen) */}
      <div className="absolute bottom-0 left-0 right-0 h-1/5
                      bg-black/70 backdrop-blur-sm z-10">
        <div className="h-full flex flex-col">
          <div className="px-4 py-2 border-b border-white/20">
            <h2 className="text-white text-sm font-semibold uppercase">
              COCO Object Detections
            </h2>
          </div>
          <div ref={logRef}
               className="flex-1 overflow-y-auto px-4 py-2 font-mono text-sm">
            {detections.map((detection, index) => (
              <div key={`${detection.timestamp}-${index}`}
                   className="text-white/90 py-0.5">
                <span className="text-green-400">
                  [{detection.confidence}%]
                </span>{" "}
                <span className="text-yellow-300">
                  {detection.label}
                </span>{" "}
                <span className="text-white/50 text-xs">
                  {new Date(detection.timestamp).toLocaleTimeString()}
                </span>
              </div>
            ))}
          </div>
        </div>
      </div>
    </div>
  );
}

export default App;
UI Features:
- Full-screen MJPEG video feed via a simple
<img>tag - Semi-transparent overlay at the bottom (1/5 of screen height)
- Detection entries show confidence in green, label in yellow, time in gray
- Auto-scrolls to show the latest detections
Configure Entitlements
The wendy.json file specifies the required device permissions:
{
  "appId": "com.example.python-yolov8",
  "version": "0.0.1",
  "entitlements": [
    { "type": "network", "mode": "host" },
    { "type": "gpu" },
    { "type": "video" }
  ],
  "readiness": {
    "tcpSocket": { "port": 3003 },
    "timeoutSeconds": 30
  },
  "hooks": {
    "postStart": {
      "cli": "open http://${WENDY_HOSTNAME}:3003"
    }
  }
}- network (host mode): Allows binding to ports directly on the device
- gpu: Enables CUDA acceleration for YOLOv8 inference
- video: Grants access to
/dev/video*webcam devices - readiness: Waits for port
3003to accept connections before proceeding - postStart: Automatically opens the detection UI in your browser once ready
Linux users: Replace open with xdg-open in the postStart hook:
"cli": "xdg-open http://${WENDY_HOSTNAME}:3003"Deploy to Your Device
Connect your USB webcam to the Jetson, then run:
wendy runThe CLI will:
- Build the Docker image (cross-compiling for ARM64)
- Push the image to your device's local registry
- Start the container with the configured entitlements
wendy run
✔︎ Searching for WendyOS devices [5.0s]
✔︎ Which device?: wendyos-zestful-stork.local [USB, LAN]
✔︎ Builder ready [0.2s]
✔︎ Container built and uploaded successfully! [45.2s]
✔ Success
  Started app
INFO:     Uvicorn running on http://0.0.0.0:3003
Your browser will open automatically once the detection server is ready, thanks to the postStart hook. If it doesn't, navigate to:
http://wendyos-zestful-stork.local:3003Replace the hostname with your device's actual hostname.
Speeding Up Uploads
The Ultralytics Jetson image is large (5-9 GB), which can make initial deployments slow over Wi-Fi.
Use USB-3 Direct Connection
For the fastest uploads, connect your laptop directly to the Jetson via USB-C:
- Use a USB 3.0 or USB-C cable (not USB 2.0)
- The Wendy CLI will automatically detect the USB connection
- Uploads over USB are significantly faster than Wi-Fi or Ethernet
# The CLI will show [USB] when connected via USB
wendy discover
╭─────────────────────────────────────┬───────────────────╮
│ Device                              │ Connection        │
├─────────────────────────────────────┼───────────────────┤
│ wendyos-zestful-stork.local         │ USB, LAN          │
╰─────────────────────────────────────┴───────────────────╯
Subsequent Deploys Are Fast
Docker layer caching means that after the initial upload:
- Only changed layers are uploaded
- Code changes typically upload in seconds
- The large base image layers are cached on the device
Troubleshooting
Next Steps
- Modify the detection filter in
app.pyto only show specific object classes - Add audio alerts when certain objects are detected
- Implement recording of detection events to a database
- Try different YOLOv8 model sizes (
yolov8s.pt,yolov8m.pt) for better accuracy